Thursday, May 13, 2010

Pinwheel Flower Buckle

This is my favorite buckle at the moment. Really it is. I find myself staying up way too late at night making them just because I enjoy them so much. This is the one that I wore when I went on Studio 5. It is so much fun and so easy to make. They also look fantastic as hair clips and glued to headbands. Once you start, you will be hooked!


Aren't these fun as buckles! Really!
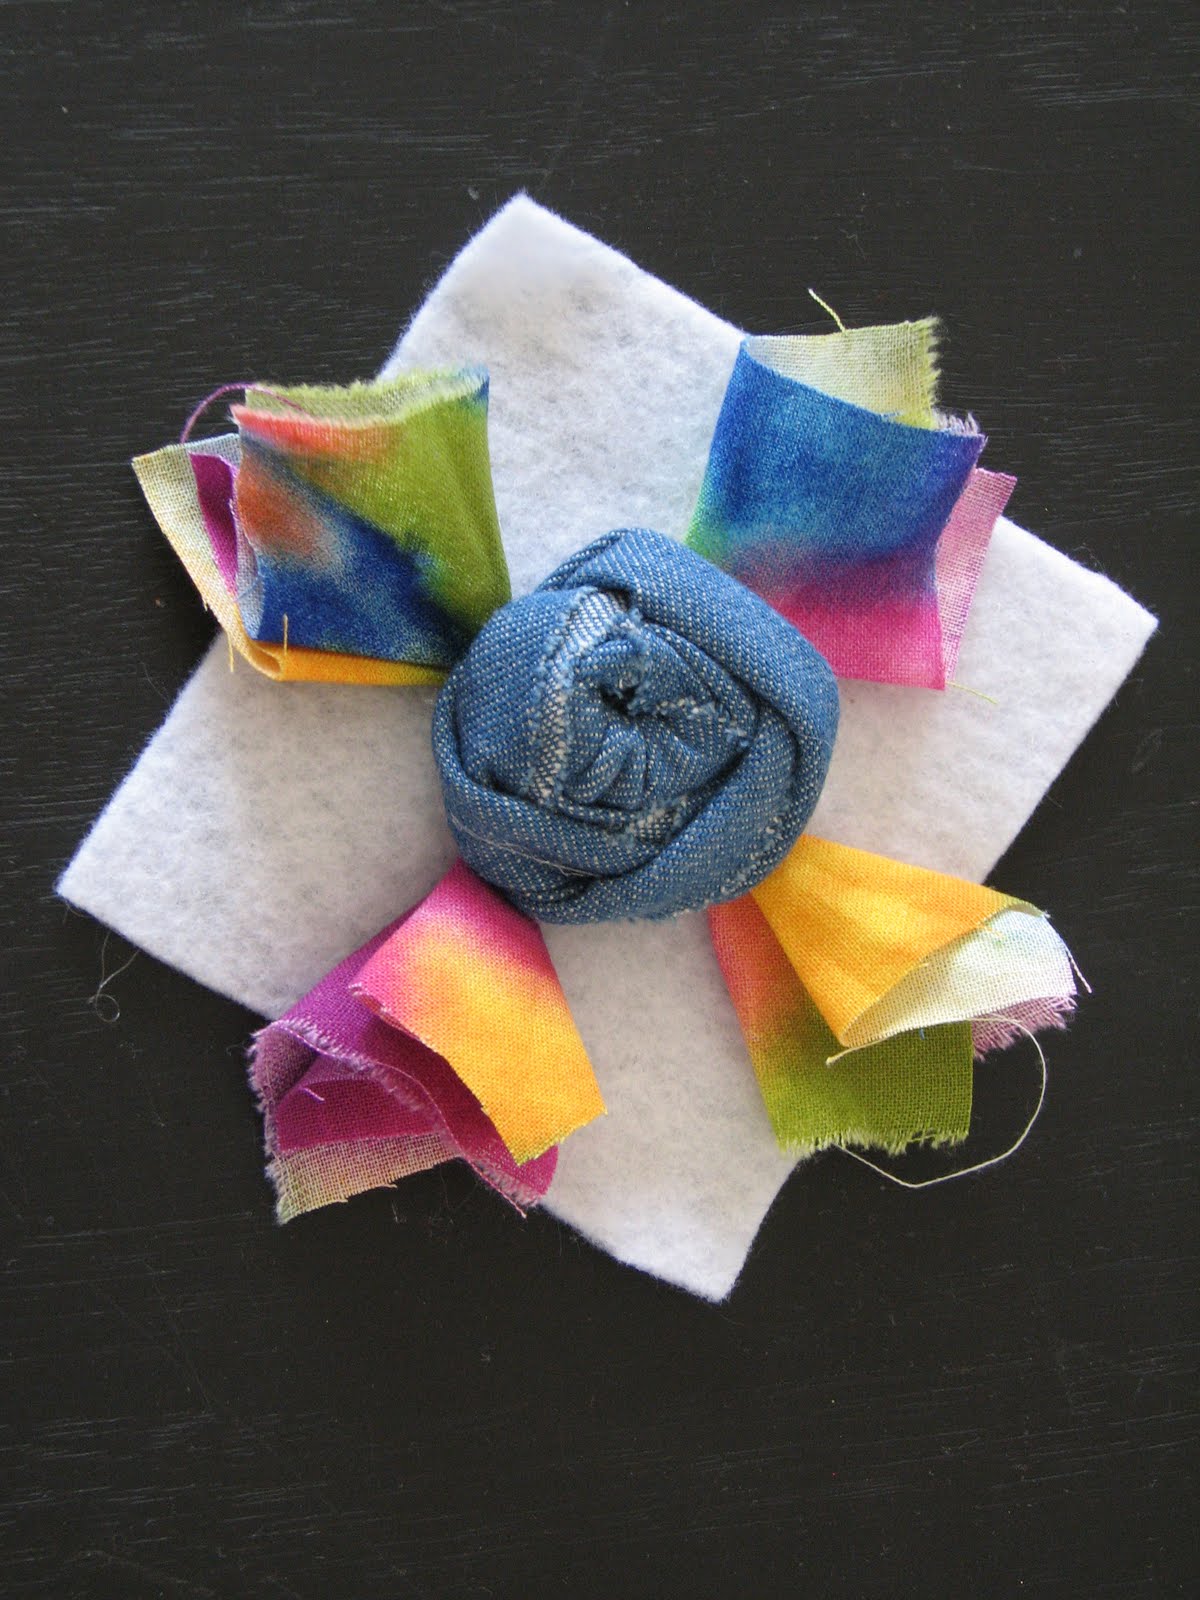
To start off you will need to have 16- 2 1/2" squares of fabric, a 3" square of felt, a center (large bead, button, fabric roses are my personal preference.) Start by gluing your center to middle of the fabric square.

Then take and pinch your square on the sides and then fold it in itself so that the center of the square becomes a point.

Dab a bit of hot glue (or fabric glue or you can sew it) on the point of the square and gently tuck it under the center. Do that four times around the center.
Then, take two more square and glue them on the inside edges of one of the openings.
Take one last square and glue it in the center of the last two "fans."


Repeat this around the entire center. You will end up with a great pinwheel design.
Turn the flower over and cut the felt around the edges of the hot glue so that you don't see the felt peeking out from underneath your flower.

For a different look, you can cut out circles instead of squares, alternate colors or both! For alternating colors, you will need 8 squares or circles of each color.
For alternating colors, glue down your center and glue into place 4 fans that are of the same fabric

With the coordinating fabric, glue one on either side of the opening.
Finish off with a final "fan" in the original fabric and repeat around the entire center.

This flower looks more like a flower than pinwheel. Cute, fun and just a bit different.

Wednesday, May 12, 2010

Twisted Fabric Rose

There are several tutorials out there on the web for these cute fabric roses. I am putting out how I do them because everyone tweaks their ideas with creativity. Right??? Also, I have to apologize for the fuzzy shots. My camera isn't wanting to work with me today! If these are unclear in any way, let me know and I will clarify.


Start by taking a strip of fabric 3"x18". Fold it in half and iron.

Tie a knot in one end.
Hot glue the short end to the underside of the knot.

Bring around the long and and hot glue to the SIDE of the knot.

Rotate the center knot 90 degrees and twist the fabric strip. Glue in place. Continue to turn and twist and glue at every quarter turn.

To finish off the rose, do one final quarter turn and flip and glue the end of the strip of the fabric to the bottom of the rosette.

Tuesday, May 11, 2010

The Ruffle Buckle

If you were watching Studio 5 yesterday, this is the buckle that we briefly demonstrated. This one is super easy and super fast. I love this one! This one is fun for all your belts PLUS looks fantastic clipped onto a jacket or a purse!

Start by starching and ironing a strip of fabric. I chose to do 44" by 3". This gives a VERY full flower. You don't HAVE to starch but, I think that it yields amazing results and keeps the puffiness and stiffness that I like. Fold the fabric in half down the length of the strip and press again.

Open it up and finger press it open. If you have a sewing machine, run a basting stitch down the crease. If you don't, simply run a long running stitch with needle and thread down the middle. When you are done, pull the thread to gather the fabric. (I cheated here and used my pleating foot on my machine. I love my pleating foot!)

Fold again over the original crease and iron flat.

Cut a 2 to 3 inch circle of felt.

Starting on the outside edge, run a small line of hot glue around the edge of the circle. Gently ease the ruffle around the edge where you have put your glue.

When you come around the beginning of your circle start gluing about 1/4 of an inch below the first ruffle.
Come around until you have just a small center opening.
Fill the center with hot glue. I put a decent sized pool of glue in there.

Roll up the remaining tail of your gather fabric as shown here.

Top view of rolled end of gathering.

Push in the roll that you have just made into the center of your ruffle circle. Tweak it a little so that the entire bottom edge is secured in the glue. Ta Da! Your ruffle is complete.

To attach the clip (This method will remain the same throughout all the buckles that we will be making. So, in future posts, I won't be repeating it.)

Cut an oval of felt about 1 1/2 long and 1/2 wide.

Notice the angle up side of the clip, that is the top side (just in case you weren't quite sure on that one ;)

Be generous with the hot glue and put enough on there to make the clip stick and clamp the clip over the top of the glue. Make sure that the glue is coming out through the TOP side of the clip.

Dab the underside of your buckle with glue.

Press the clip and the buckle together. There! You are done. To clip this onto your belt, simple slide it in the opening that is used to hold your D-rings. It fits perfectly there and the buckle is large enough to cover and hide your D-rings!

Sunday, May 9, 2010

Buckle A Day

Getting ready for Studio 5 took me a little more time than I had anticipated. I wasn't able to get all of the buckle tutorials ready to put up on the blog before the show started. Instead, I thought that it would be fun to do a buckle a day! Check back every day to find a new way to embellish your buckles! You won't be disappointed.

Friday, May 7, 2010

Fun, Fast and Chic... That's the way to wear a belt!


Making a Chic and Snazzy Belt

I am showcasing this tutorial as well as the buckle tutorial on Monday, May 10th on KSL Studio 5 at 11:00. Tune in to watch!

Tools Needed:

Fabric: For the length, measure around the hips of the person that the belt is intended for and add 8 inches. For the width, pick the width that you would like, double it and add one inch.

For this example, I cut the fabric across the fabric bias and ended up with 4” wide and 44” long. This will make a 1 ½” wide belt
(1 ½” doubled = 3inches plus one inch for seam allowance= 4” wide)

Fusible Fleece Interfacing: For this belt, I wanted a bit more stability so, we cut the interfacing 3” by 43”.
D Rings: They sell them in a 2 pack for less than a dollar at most Walmart or craft stores.

Additional Items: Spray Starch, Iron and Board, Sewing Machine.


Lets Get started!

1. Lay out your strip of fabric and iron it well. I use steam and spray starch. The starch makes the creases crisp and makes things look nicer.


2. On the wrong side of your fabric, iron on your piece of fusible interfacing.


3. Starting with the short ends, fold the fabric over the interfacing and iron into place.


4. Fold entire length of belt in half. Press it in place.


5. Staring on the short side at the middle crease, stitch the belt together as close to the edge as you can. Stitch all around of the edges.

6. Using your sewing machine foot as a guide, make two additional seams on the inside of first seams.


7. Make one more seam down the middle of the belt. This is a great chance to try out those fancy, decorative stitches on your machine!


8. Pull one end the belt through a set of the D-Rings about 1 ½” and stitch down. Go over the seam a couple of times to make it secure.


9. Now comes the fun part! There are so many fun ideas that you can use to make buckles for your belts. Find your favorite hair clip and slip it through the open loop below the D-Rings. Slip your new belt on and show it off.


Buckles are fun and easy to make. Check back for additional tutorials on making the buckles that go on these fabulous belts!

5 Minute Chocolate Cake


I posted this about a year ago but, there has been an overwhelming desire for it lately so, I thought that I would post it again. This is one of my favorite recipes and...... the best part....... it only takes 3 minutes to make. Yep. That is it.

Last week, I promised my kiddos that we would make a treat but, I failed to pick up the right ingredients at the store. So, I did what any mother would do. I panicked and quickly racked my brain for something fun, fast, easy and yummy. You don't get any easier that this. It is almost more fun to make than it is to eat.

The kiddos loved watching their cakes rise in the microwave. I loved eating it. Now, it is terribly unhealthy but, oh so yummy. We love ours drenched in chocolate syrup.

5 MINUTE CHOCOLATE MUG CAKE
4 tablespoons flour
4 tablespoons sugar
2 tablespoons cocoa
1 egg
3 tablespoons milk
3 tablespoons oil
3 tablespoons chocolate chips (optional but oh so incredibly worth it)
a small splash of vanilla extract
1 large coffee mug

Add dry ingredients to mug, and mix well. Add the egg and mix thoroughly. Pour in the milk and oil and mix well. Add the chocolate chips (if using) and vanilla extract, and mix again.

Put your mug in the microwave and cook for 3 minutes at 1000 watts (high). The cake will rise over the top of the mug, but don't be alarmed!

Allow to cool a little, and tip out onto a plate if desired. EAT! (this can serve 2 if you want to feel slightly more virtuous). And why is this the most dangerous cake recipe in the world?
Because now we are all only 5 minutes away from chocolate cake at any time of the day or night! You are going to print this out straight away, aren't you? I don't blame you one bit!

Tuesday, April 13, 2010

Sewing Tips

Run on over to Grosgrain and see the awesome sewing tips that she has posted links to. There are links for covering buttons, sewing in zippers and sewing in set sleeves! It is worth a peek!

Sewing Tips

Tuesday, April 6, 2010

Layered Skirt


I will admit, I drooled a little when I saw this darling skirt over at Ruffles and Stuff. I immediately went and made one for my fairy!


Layered Skirt