

Start by starching and ironing a strip of fabric. I chose to do 44" by 3". This gives a VERY full flower. You don't HAVE to starch but, I think that it yields amazing results and keeps the puffiness and stiffness that I like. Fold the fabric in half down the length of the strip and press again.

Open it up and finger press it open.
 If you have a sewing machine, run a basting stitch down the crease. If you don't, simply run a long running stitch with needle and thread down the middle. When you are done, pull the thread to gather the fabric. (I cheated here and used my pleating foot on my machine. I love my pleating foot!)
Fold again over the original crease and iron flat.

Cut a 2 to 3 inch circle of felt.

Starting on the outside edge, run a small line of hot glue around the edge of the circle. Gently ease the ruffle around the edge where you have put your glue.

When you come around the beginning of your circle start gluing about 1/4 of an inch below the first ruffle.
 Come around until you have just a small center opening.
  Fill the center with hot glue. I put a decent sized pool of glue in there.
Roll up the remaining tail of your gather fabric as shown here.

Top view of rolled end of gathering.

Push in the roll that you have just made into the center of your ruffle circle. Tweak it a little so that the entire bottom edge is secured in the glue. Ta Da! Your ruffle is complete.

To attach the clip (This method will remain the same throughout all the buckles that we will be making. So, in future posts, I won't be repeating it.)
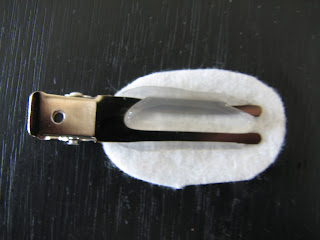
Cut an oval of felt about 1 1/2 long and 1/2 wide.

Notice the angle up side of the clip, that is the top side (just in case you weren't quite sure on that one ;)

Be generous with the hot glue and put enough on there to make the clip stick and clamp the clip over the top of the glue. Make sure that the glue is coming out through the TOP side of the clip.

Dab the underside of your buckle with glue.

Press the clip and the buckle together. There! You are done. To clip this onto your belt, simple slide it in the opening that is used to hold your D-rings. It fits perfectly there and the buckle is large enough to cover and hide your D-rings!


1 comment:
Looks Fairy easy.
Are these washable? I always spill on most anything I wear.
Post a Comment